Felted Hat & Baby Bunting

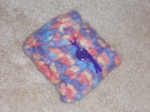
Hello everyone!  I have just been working up a storm.  I’ve made a few things which I will post on here.  The first is a felt wide-brimmed hat which I am getting a lot of feedback on.  This is a really popular hat.  I used the “Apple Orchard Goody Pack” from www.livingfelt.com and it is awesome!  You have to try it if you haven’t already.  Here is what it looked like when I started out and then proceeded.

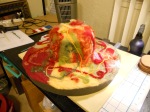
Then after working on it for awhile and getting things just right. It was done.

This slideshow requires JavaScript.

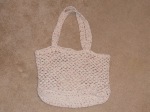
   I cant wait to take it out for a spin.  I’ve already had some offers on it.  It really turned out quite well.  You want to make sure you put enough batting on the brim so its not too thin.  If you have to, go back and add the batt in later on and continue to felt it making it more firm.  You just use your imagination and soon you will have a one of a kind creation.

Next is a Baby Bunting or Cocoon.  I changed the pattern a little to fit my liking.  I like patterns to be simple.  I don’t see any sense in a pattern that is difficult.  So if you want my pattern feel free to email me or comment on this site and I will work up the pattern and post it.  Otherwise there is a good pattern at www.allfreecrochet.com  .  They  have a wealth of patterns.  I am checking out a new site now with new patterns.  Actually old patterns.  I’ll let you know how they work out.

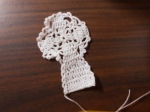
Hairpin Lace.  Has anyone tried it?  I have worked up my first strip of lace and it is awesome.  I am trying to figure out ways to incorporate it into my crochet projects.  I think its going to turn out really pretty in a baby bunting.  Probably not really practical but really pretty.

I hope you all have a really good time crocheting these projects.  So until then, May your hands work be blessed and your felt work fulfilling!

Categories: Felting, Loom knitting & Felting | Tags: , , , , , , , , , , | Leave a comment


Bath Mat

Well Hello everyone!  Isnt it a beautiful day?!?  I have just been so busy around here and just loving it.  I have been working on this Bath Mat for several days and Im going to give you the pattern.  I tried it out last night for the first time  and it worked great! It needs to be washed and blocked to make it look right but it is really pretty.  Finished size: Approximately 16 X 20″.

Im going to make another one for my husbands bathroom.  Im just sure he will love it.  So here is the pattern.

Bath Mat

Use 2 contrasting cotton color yarns.  I used a cone of each color and didnt use all of either color.  If that helps.

Stitches used: ch (chain), sc (single crochet), tre (treble crochet).

Size G hook

Row 1:  ch 44,  sc in 2nd ch from hook and in each ch across, ch 1, turn.

Row 2:  *sc in first sc, tre in next sc*, repeat from * across, ch 1, turn.

Row 3:  sc in each stitch across, ch 1, turn.

Rows 4-7: Repeat rows 2 & 3 twice.

Row 8 – 52:  sc in ea sc across, ch1, turn.

Row 53-60:  repeat rows 2 & 3 three times, fasten off.

Border: Using contrasting color slip stitch to any corner.

Round 1:  sc 3 times in corner, sc in each stitch across to next corner, sc 3 times in that corner, work sc in spaces along edge to next corner, sc 3 times in corner, sc in each stitch across, sc 3 times in corner, work sc in spaces along edge to next corner, sl st to first sc made, ch 1.

Rounds 2-10:  sc 3 times in middle sc of 3 sc group, sc in ea sc across, sc in middle sc of 3 sc group, sc in each sc across, sc in middle sc of 3 sc group, sc in each sc across, sc in middle of 3 sc group, sc across, sl st to first sc made, ch 1.  At the end of row 10 fasten off or if you prefer a bigger border then just keep on going.

Weave in ends. Enjoy.

If you have any problems with it please feel free to email me or leave a comment here on this site.  I will respond as quickly as I can.  Ya’ll take care and have a beautiful day!

And as always, May your handswork be blessed and your felting fulfilling!

Categories: Crochet, Loom knitting & Felting | Tags: , , , , , , , , , , , , , | 18 Comments


How to make a Candle

Hello Everyone!  Its a beautiful day here in Phoenix.  Hope its just as beautiful wherever you are.  I made a video of how to make a candle while I was on retreat at Lake Pleasant.  I hope you enjoy it.  I used some empty vegetable cans for some of the candles.  I just took a pair of tin snips and cut down diagonally from the top of the can.  Making little v’s.  Then I took my needle nose pliers and curled the v’s down and under.  They turned out pretty good.  They make nice outdoor candles.  You could spray paint them too if you wish.  Enjoy the video!

http://youtu.be/QCqnTlPUOco

Categories: candlemaking | Tags: , , , , , , , , , | Leave a comment


How to crochet a bumpy dishcloth

Hello everyone!  I just got back from spending ten days out at beautiful Lake Pleasant, Arizona.  Once a year I do that.  Its my spiritual retreat.  Time to reconnect with God and also make an abundance of items to give away to friends and family or to sell.  This year I made candles and potholders and dishcloths.  I figured out the perfect pattern for a dishcloth which I will share with you.  I will soon be posting the video on how to make candles with vegetable cans.  They actually look pretty cool!  The ones I made I did on a coleman stove out at the lake and for some reason it just seems to make them all that much more special.  They are really easy to do and I think you will enjoy making some for yourself or your friends.  But for now, let me give you the pattern for making the dishcloth.  The pattern for the potholders is on my post “Potholders”.  If you wish to purchase these potholders and dishcloths go here:  http://www.etsy.com/shop/onceuponafiber

Bumpy Dishcloth

Materials:  I use sugar n cream cotton yarn.  1 skein makes 1 dishcloth at least.

Size G hook

Ch 30

Row 1: sc in each ch across, ch 2 turn.

Row 1:  * dc in first sc, sc in next sc * repeat from * to* across, ending with dc, ch 1 turn

Row 2:  sc in next st and in each st across, ch 1 turn

Row 3:  * sc in next sc, sc in next sc, ch 3* repeat from * to * across, ch 1 turn

Row 4:  sc in each sc across, ch 1 turn

Row 5-8: * dc in next st, sc in next st * repeat across

Note: If you end the row in a sc, ch2 , turn and your first stitch will be sc.  If you end in dc, ch 1, turn and dc in first st.

Repeat rows 2-8 : 3 times

repeat rows 2-4 once

End row: *dc in next st, sc in next st* repeat from * to * across. Fasten off.

Well have fun making this dishcloth and potholders and as always May your handwork be blessed and your felting fulfilling!  Happy Creating!

Categories: Crochet, Loom knitting & Felting | Tags: , , , | 2 Comments


How to Crochet a 4th of July Coaster

Hi everybody!  What a beautiful day here in Phoenix!  Today I’m going to teach you how to crochet a coaster for the 4th of July.  Red, White, and Blue, here I come. lol  The pattern is my own and its very basic and simple.  Feel free to use it as you please and give me credit if you happen to think about it.  So without further ado…. Oh yea, if you don’t want to make them yourself but you prefer to buy them. I have a set of 8 for sale at : http://www.etsy.com/listing/96791581/4th-of-july-coaster-set-of-8

meanwhile, here is the pattern:

Here is the video:http://www.youtube.com/watch?v=Fkr-ujOdGXE

4th of July Coasters

By Toni Lombardi  copyright 2012

Materials:  One skein of each color yarn: red, white, and blue

Size G crochet hook

Work all rounds from same side.

Rnd. 1 : Start with red yarn and a “Magic Circle” and ch 3 then 12 dc in ring, pull up tight, change color without making a knot, sl st to top of ch 3. 13 dc

Rnd. 2 :  ch 3, dc in same place as ch 3, 2 dc in each dc around, sl st to top of ch 3 with new color. 26 dc

Rnd. 3: dc in same st as ch 3,* dc in next dc, 2 dc in next dc,* repeat from* around ending with dc in dc, sl st to top of ch 3. Break yarn and weave in ends.

And as always, May your handwork be blessed and your feltwork fulfilling!  Happy Creating!

Categories: Crochet, Loom knitting & Felting | Tags: , , , , , , , , , | 2 Comments


A Warm Cozy Hat

So, I made this warm beanie on a number 3 round loom using the stockinette stitch.  In case you dont know what that is, its just a regular ewrap.  I ewrap for about 10 rows and then take the loops from the first row and place them over the corresponding pegs. Knit over and continue on as usual.  That creates the brim so your edges dont curl up.  At the end I use the basic gathering method and sew back and forth across the top to make it secure and Whala!  you’re done!  If you like you can make a pom pom to put on top.  If you wish to purchase this beanie rather than make it yourself, go here:  http://www.etsy.com/listing/96021702/warm-soft-cozy-beanie

And as always May your handwork be blessed and your feltwork be fulfilling!  Happy Creating!

Categories: Loom knitting & Felting | Tags: , , , , , , , , , | Leave a comment


Pocket Scarf

Aren”t these cool?!?  I found this pattern at www.allfreecrochet.com .  Its great!  I love it! I helps keep me warm. But not too warm.  And the pockets can carry my kleenex or whatever else I might want to stick into them.  It was so easy to make too! Make one for yourself or someone you care about.  I made mine out of wool so its extra cozy. The lapel is done in my favorite rib stitch.


So As always may your handwork be blessed and your feltwork be fulfilling!  Happy Creating!

Categories: Loom knitting & Felting | Tags: , , , , , , , , , , | Leave a comment


Knitted Felted Infant Beanie

Hi everyone!  Today we have a knitted felted beanie made just for an Infant.  Your babies will love this hat.  It is made of 100% wool and is snugly warm.  You can purchase it here:  http://www.etsy.com/listing/95713878/knitted-felted-infant-beanie

If you want to make this hat, you will need the following items:  Bernat Felting Natural Wool (Folklore),  number 2 or second smallest round knitting loom.

Ewrap the first 5 rows then purl the next 5 rows, pull your first stitches over the pegs and knit over. This will make your brim.  Finish ewrapping to make the hat as long as you wish.  Use the gathering method to finish off. For more detailed instructions see my other post entitled “Loom Knitted & Felted Infant Hat” and use these instructions for the brim.   Whala!  You are done!  It takes no time at all and you will have a blast.

As always may your hands be blessed and your feltwork be fulfilling!  Happy Creating!  Toni

Categories: Felting, Loom knitting & Felting | Tags: , , , , , , , , , , , , | Leave a comment


Light Brown Tam

This light brown Tam will go wonderfully with just about any outfit.  Check it out http://www.etsy.com/listing/95100308/light-brown-tam  I hope you think so too.

Categories: Loom knitting & Felting | Tags: , , , | Leave a comment


Long Warm Soft Scarf

I just finished this loom knitted scarf.  If you wish to purchase it go to http://www.etsy.com/shop/onceuponafiber  and purchase it on etsy.  If you want to make one of your own, use the smallest long loom and do the double knit stitch until the peice measures almost 6 feet long.  I used the Baby Blanket Yarn byBernat. You will need 2 large skeins.

And as always may your hand work be blessed and your felting fulfilling!  Happy Creating!

Categories: Loom knitting & Felting | Tags: , , , , , , , , | Leave a comment


Socks and Purses and Flowers Oh My!

This slideshow requires JavaScript.

Well I have just been a busy beaver and  these are just a few of the things that I have made.  The socks I loom knitted for my daughter using a pattern from the book “Loom Knitting Primer” by Isela Phelps.  The purse I loom knitted by using the stockinette stitch on 20 pegs until the piece measured approximately 18 inches. Then I crocheted the handle using a hdc (half double crochet).6 stitches and worked it until it was about 20 inches long.Since I used 100% wool yarn I felted it in the washer in hot water.  Then I layed it out to dry on a towel  The flowers I made using my very own Five Minute Flower Pattern, some acrylic yarn and a size G and H crochet hooks.  They are really easy.  Have fun!  I know I did! LOL

5 Minute Flower

Hook size G, worsted weight yarn.

Slip knot on hook and ch 2

Row 1:  10 sc in first ch, join with sl st.

Row 2:  ch 1 sc in same ch 1 space, 3 dc in next sc, *2 sc in next sc, 3 dc in next sc * repeat from * around.  Sl st to first ch, fasten off.  Leave a 10 inch tail to attach flower to whatever you fancy.

Find  contrasting button or other adornment to hot glue in the center.

So get out your looms and crochet needles and create some fun!  And as always May your hands work be blessed and your fiberwork fulfilling!  Happy Creating!

This slideshow requires JavaScript.

As always May your hands be blessed and your feltwork fulfilling!  Happy Creating!

Categories: Crochet, Loom knitting & Felting | Tags: , , , , , , , , , , , , , , , , , , | 1 Comment


Felting with Grandkids

Hello everyone!  I had the great opportunity to spend 5 days and nights with my Grandaughter at our house last month and we had a really good time making a felt square.  Its very easy and simple to do and the kids really get a kick out of being able to make something out of relatively nothing.

First you want to lay down some bubble wrap (bubbles up) or a bamboo roll then lay a kitchen towel down on top of that, then lay down a layer of netting or jersey material (the kind with holes in it). Next you take 4 layers of a white core wool and layer them criss cross on top of one another and then lay in your color wool roving in thin strips on top of that in whatever shapes that you want .  Next you want to make up some soapy water by shredding a bar of olive oil soap or I use laundry soap that you can buy at Wal-Mart for 1.99 and shred about 1/3 cup to make a gallon of soapy water.  Be sure to use soap and not detergent. Fill a 1 gallon milk jug a quarter full with hot water and add your shredded soap.  Allow it to sit for about 30 minutes then fill it to the top with hot water.  This is your soap base.  Use this for all of your projects since you cant stop at just one.lol  Now, take about 1/4 cup of soapy water base and put it in a squeeze bottle like and empty ketsup bottle and fill it the rest of the way with hot water.  Squeeze the soapy water onto the wool until it is saturated.Now lay down another layer of netting.  Now using your fingers on top of the netting pushing gently on the wool, make little circles.  Add more soapy water if you need to make it slick to where your hands glide smoothly over the netting.  Next we do what is called fulling.  Roll up your whole bundle to where its good and tight  and use a couple of cotton strings to tie it tightly with and using your arms roll it back and forth on the table about fiftly times. Some people use a dowel to wrap it around or you can use one of those swimming Noodles cut to size.Next do what I did and have your grandchildren roll it part of the time and you roll it part of the time.  When your finished rolling untie your bundle and gently peel back your layer of netting. Turn your new square one quarter turn, replace your netting, roll it up and roll back and forth again for fifty times.  Repeat this process two more times. Once your finished with all your turning and rolling, peel back the netting and gently pinch the new felt to make sure that the fibers have felted together, felting is done, and all the colored wool is felted to the white wool.  Whala! You have just made felt!  Isnt it fun?  You can even make one with your name on it.  I strongly encourage you to check out some books at the library on wet felting so you can see just what all can be made and the different ways to go about it .  Look online.  I will be making a video very soon on how to wet felt a square.  I am going to put all my felt squares together like a quilt and make a felt blanket.  Im sure I will post it when its done.  Your felt should be thin if you peeled the layers apart right from your batch of white core wool.  If not it will turn out like some of mine did and be really thick.lol

I hope you have fun felting and if you have any questions feel free to ask me.  Just use the comment box or check us out on facebook. Just look for Once Upon A Fiber.Com and message me there.

You can get your felting supplies at www.livingfelt.com for a really good price.  You get more bang for your buck there than anywhere else that I have found so far.  I strongly recommend purchasing supplies from them.  You wont regret it.  I would start off getting the white core wool for wet felting and then just buy a few colors of the wool roving if you dont plan on going into business and maybe you can find someone to go in on it with you cause you will get a lot of white core wool.  Enough for several maybe 30 or 40 squares.  They also have the bamboo or plastic to make your rolls with and the netting.  And I dont get anything for sending you to them.  I have just checked out all of the craft stores and was thankful that I purchased my stuff from livingfelt.com.  They have videos on their site to help you learn all about wet felting and other types of felting. They are a great Company.   Dont forget to keep those Granbabys busy! 

This slideshow requires JavaScript.

Until Next time may your hands work be blessed and your fiber work fulfilling!  Happy Creating!

Categories: Felting, Loom knitting & Felting | Tags: , , , , , , , , , , , , , , , , , , , , , | Leave a comment


Potholder

Well, I found a great stitch to use as a potholder.  Its called the rib stitch in crochet.  I just love it!  It has depth to it which makes it perfect for a potholder.  Heres the pattern:

you will need:  worsted weight 100% cotton yarn, size F crochet hook.

Stitches used:  ch,dc, fpdc,bpdc, hdc.

1 skein makes 2 potholders.

Make a slip knot and put it on your hook. Chain in multiples of 2.  I chained 20. DC in 3rd ch from hook and in each ch accross.

Row 2:** * FPDC around 2nd dc, BPDC around next DC * repeat from *to* across, hdc in last dc or ch 2 made, ch 2 turn** repeat from ** to **  for entire piece.

If there is a fpdc put a fpdc and if there is a bpdc put a bpdc. Follow what the pattern does.

Watch the video. Click here. http://www.youtube.com/watch?v=G4DBUUScYgY  This is super easy!  You will love making things with this stitch.  And as always may your hands be blessed and your fiber work fullfilling!                 HappyCreating !

Categories: Crochet, Loom knitting & Felting | Tags: , , , , , , , , , , , , , , | 2 Comments


St. Pattys Day Video & Crochet Instructions

Today I made a new video on how to make a four leaf clover out of yarn.  Crocheting. The pattern was by Marlo D. Cairns copyright 2001. I found it on AllFreeCrochet.com .  It was super easy and only took about five minutes to make.  I took it one step further and made a smaller one and attached it to the top of the bigger one.  It looks really good. Check out the video!   http://youtu.be/uAhz022pYH4

As always, May your hands work be blessed and your fiber work be fulfilling!

Here’s the pattern.

Materials needed:  Small amount of worsted weight green yarn, size H hook, pin backing.

Ch 4, join with a sl st to form a ring

*ch8, insert hook into 2nd ch from hook, yo, and pull through chain, leave loop on hook* repeat from * to * in next 6 chs (you will have 8 loops on hook), yo and pull through 4 loops on hook, yo and pull through 5 loops on hook, sl st in ring* repeat from * to * 3 times. { (I do the repeat 2 times for a 3 leaf clover and 3 times for a 4 leaf clover)tl.}

Stem: ch 7, sl st in 2nd ch from hook and in the next 5chs, sl st into ring and fasten off.

Have a Happy St. Pattys Day!!!

Categories: Crochet, Loom knitting & Felting | Tags: , , , , , , | 1 Comment


Something New Every Day

You know, everyday I make something. whether it be a bookmark, a batch of homemade lotion, or just a spritz to keep the bugs away.  I make something.  I forget that these things might be useful to all of you.  So I will try to remember to jot them all down and document them for you.  Yesterday I made a crocheted bookmark.  Not much for a day but I was a little down in the health department.  You see I have Fibromyalgia and Arthritis.  So some days even a bookmark is a hallmark.  Some days, I just create and create and create. lol  It makes me feel alive again.  It gives me purpose.  I feel the need to share my knowledge of how to do things with other people.  Its like I get to give back to the world for all the wonderful things it gives to me.  I feel truly blessed.

Back to this bookmark.  I still need to make a tail for it and then I will post the picture of it on here.  I just finished a childs purse (felted) and some 5 minute flowers.  Both of which I will take pics of and post on here.  I have a wooden table I need to finish next.   Oh yea, here is a pic a the socks I made for my daughter .  I made them on a loom. 

As always, May your hands work be blessed and your fiber work be fulfilling!

This slideshow requires JavaScript.

Categories: Loom knitting & Felting | Leave a comment


Fun with hats and other things

I recently decided to loom knit a white hat for felting and then felt some felt onto it and some wool and flowers that I crocheted.  I had a blast.  The picture says it all.  Then I crocheted a cigarette case and felted it. The hat is 26.99 and the cigarette case is 10.00 if you want me to make you one.  You can use them for lots of things other than cigarettes.  If you wish to purchase this case follow this link http://www.etsy.com/listing/94333023/crocheted-wool-felted-cigarette-case . Thank you.

cigarette case

If you wish to purchase this hat, follow this link http://www.etsy.com/listing/94331813/felted-knitted-beanie-hat

Flower Hat

Happy Creating!

Here is the pattern for the little crocheted flowers.

5 Minute Flower

Hook size G, worsted weight yarn.

Slip knot on hook and ch 2

Row 1:  10 sc in first ch, join with sl st.

Row 2:  ch 1 sc in same ch 1 space, 3 dc in next sc, *2 sc in next sc, 3 dc in next sc * repeat from * around.  Sl st to first ch, fasten off.  Leave a 10 inch tail to attach flower to whatever you fancy.

Find  contrasting button or other adornment to hot glue in the center.

As always, May your hands work be blessed and your fiber work be fulfilling!

Categories: Loom knitting & Felting | 1 Comment


Cup of Joe Tissue Cover/cozy

Cup of Joe


Cup of Joe tissue holder/cozy

For regular size rolls

For this example I used Loops & Threads Cozy Wool

 Items needed:  Crochet hook size J,

  Yarn:   Chunky size 6 in White or off white,Brown or coffee looking yarn size 6.

Row 1:  Put White yarn onto hook with a slip knot.  Chain 38, join together with slip stitch, ch 3, do not turn  Row 2:  DC in 3rd chain from hook, DC in each chain around Slip stitch into top of chain 3 DC.  Row 3-8:  ch 3, DC in 3rd chain from hook and in each DC around slip stitch in top of chain 3 DC . Row 9: Chain 3, DC in each of next 3 stitches, DC 2 tog, *DC in each of next 4 stitches, DC 2 tog,* repeat from * ending with DC to end of round , slip stitch into top of ch 3.  Fasten off.

Handle

Ch 14, DC in 3rd ch from hook and each ch across , turn.

 Row 2-6:  ch 3 DC in each DC  across, turn.

Fasten off  leaving an 18 inch tail.

Coffee

Ch 2, sc 6 times in first ch, sl st first and last sc together.

Round 2:  2 sc in each sc around, join with sl st.

It may be helpful to use stitch markers now.

Round 3:  *sc in next sc, 2 sc in next sc* repeat from * around, slip stitch into first sc

Round 4:  *sc in next  2 sc, 2 sc in next sc.  Repeat from * around, slip stitch to beginning sc.

Round 5:  *sc in next 3 sc, 2 sc in next sc. Repeat from * around, slip stitch to beginning sc.

Round 6:  *sc in next 4 sc, 2 sc in next sc. Repeat from * around, slip stitch to beginning sc. Fasten off, leaving a 17 inch tail.

 Putting it all together

Handle : Roll handle up lengthwise. Put the tail through the eye of a yarn needle and starting at the top attach handle to cup and then sew  handle together all the way down to the bottom and attach near the 7th or8th row on the cup. Knot off and weave in ends.

Coffee:  Thread tail through yarn needle and just below the brim begin to sew back and forth between the coffee and the cup all the way around. Knot off and weave in ends. 

 Original Design by April Moreland copyright 2008

This Altered design for a regular size roll is by Toni Lombardi copyright 2012

The original double roll size pattern can be found here:  http://dishclothdiaries.blogspot.com/2008/06/cup-o-joe.html


As always, May your hands work be blessed and your fiber work be fulfilling!

Categories: Loom knitting & Felting | Tags: , , | Leave a comment


Thick & Soft Scarf (made in an hour)

Continue reading

Categories: Loom knitting & Felting | 4 Comments


Adult Loom Knitted Beanie

This wonderfully soft & squeezy beanie is so warm and just right to keep away the winter chills.  It is made from 100% Acrylic yarn.  It is on sale for 15.99 plus shipping.  If you wish to purchase one please follow this link http://www.etsy.com/listing/93992423/beanie-hat.

Loom Knitted Beanie

To make this beanie yourself, follow the instructions below.

Use a number 3, or second from largest, round knitting loom and one skein of Jiffy Thick & Quick yarn

E cast on entire loom and knit over.  Next do* 1 round purl and 1 round of knit*.  Repeat from * to * 4 times creating a Garter stitch Border.  Next ewrap and knit over next 28 rounds.

Wrap end yarn around loom one and a half times to get the right amount of yarn to finish.  Cut yarn.  Thread yarn onto large eyed yarn needle.  Working from the bottom of each loop bring needle up and to the right going counter clockwise back to where the needle was first placed in a loop.  Use the knitting tool and take off each loop.  Pull on yarn to tighten into small circle and begin to sew across making a star.  Knot off and cut end.  Weave end into top of beanie.  Whala!  You’re Done!

Enjoy your new hat or give it away to a friend.  If you’re not the type to crochet things like this but would like to have one or give one as a gift to a friend I sell the ones that I make since its my own pattern for a reasonable price.

As always, May your hands work be blessed and your fiber work be fulfilling!

Categories: Loom knitting & Felting | Leave a comment


So Much Going On

So Much Going On

If you read my other two blogs then you know that I work in threes.  I will work on at least three different projects all at once.  I get bored with one so I move on to the next one and so on. So I have finished two items already and will finish the next one.  So very soon I will be posting pics and instructions on how to loom knit a hat and crochet a scarf in 60 minutes.  So get ready for them! As always, May your hand work be blessed and your fiber work be fulfilling!

Categories: Loom knitting & Felting | Leave a comment


Loom Knitted & Felted Infant Hat

Hello there Friends & Foes and Happy New Year!  I wanted to start off this year with a new blog and a new idea.  These conjure up the image of the New Year Baby.  So in light of this occasion we will make an infant hat.

I number my looms by size. the smallest being number 1 and so on.

  1. We want to make the loom knitted infant hat.  So we need our number 2 loom,( which would be the size to use for kids if we were not felting).  And yarn.  I used Bernat “Felting” natural wool.
  2. We need to make our brim.  So we need to e-wrap our loom and e-wrap again and knit over to make our first row. Make 12 rows and stop.
  3. Place the loop from the very first e-wrap row over the corresponding peg. Do this all the way around. Knit over.
  4. Do 22 more e-wrap rows.
  5. Bind off with a tapestry needle going through each loop left on each peg.  Remove loops from pegs and pull up slack.  Stitch back and forth accros the top of the opening and knot off. 
  6. Watch this video on How to make a Flower on a Loom.
  7. Flower.  Make a flower with a flower loom and attach with similar yarn at petal ends.
  8. Add a pom pom if you like.
  9. Put the hat in a pillow case and tie a knot.  Wash with a few towels using soap, not detergent, in hot water for one hour and then check for size.  If its felted and the size is good then take out the hat and rinse in cold water and gently squeeze out the water.  shape and leave to dry on a towel in a dry place.
  10. Whala!  You’re done!!!

Thanks for felting with me and as always May your hands work be blessed!

Click here to watch the video on how to attach the flower to a Loom Knitted, Felted, Hat.

Categories: Loom knitting & Felting | 6 Comments

Blog at WordPress.com.